| 일 | 월 | 화 | 수 | 목 | 금 | 토 |
|---|---|---|---|---|---|---|
| 1 | 2 | 3 | 4 | 5 | 6 | 7 |
| 8 | 9 | 10 | 11 | 12 | 13 | 14 |
| 15 | 16 | 17 | 18 | 19 | 20 | 21 |
| 22 | 23 | 24 | 25 | 26 | 27 | 28 |
| 29 | 30 | 31 |
- 주변에는 능력자 뿐이야!!
- 나도 코딩 잘할래!!!!!!!!!!!
- 크레인 인형뽑기
- 누가 보기는 하는걸까...ㅠㅠ
- 플러터
- bloc
- 플러터 책
- 프로그래머스
- FutureBuilder
- dfs
- 이직
- 댓글이 하나도 없오...ㅠㅠ
- 편하다요
- TODO
- 포?코DX
- 다트&플러터
- 주니어개발자
- network
- Flutter2.8
- flutter_secure_storage
- Null Safety
- hero animation
- flutter_local_notification
- 다트 책
- flutter
- 쒸익!!!!!!!!!
- flutter-layout
- 코딩 잘하고 싶어!!
- flutter secure storage
- open weather api
- Today
- Total
오늘하루도 우힣ㅎ
Flutter) Bloc으로 Todo List 만들기 (2) 본문
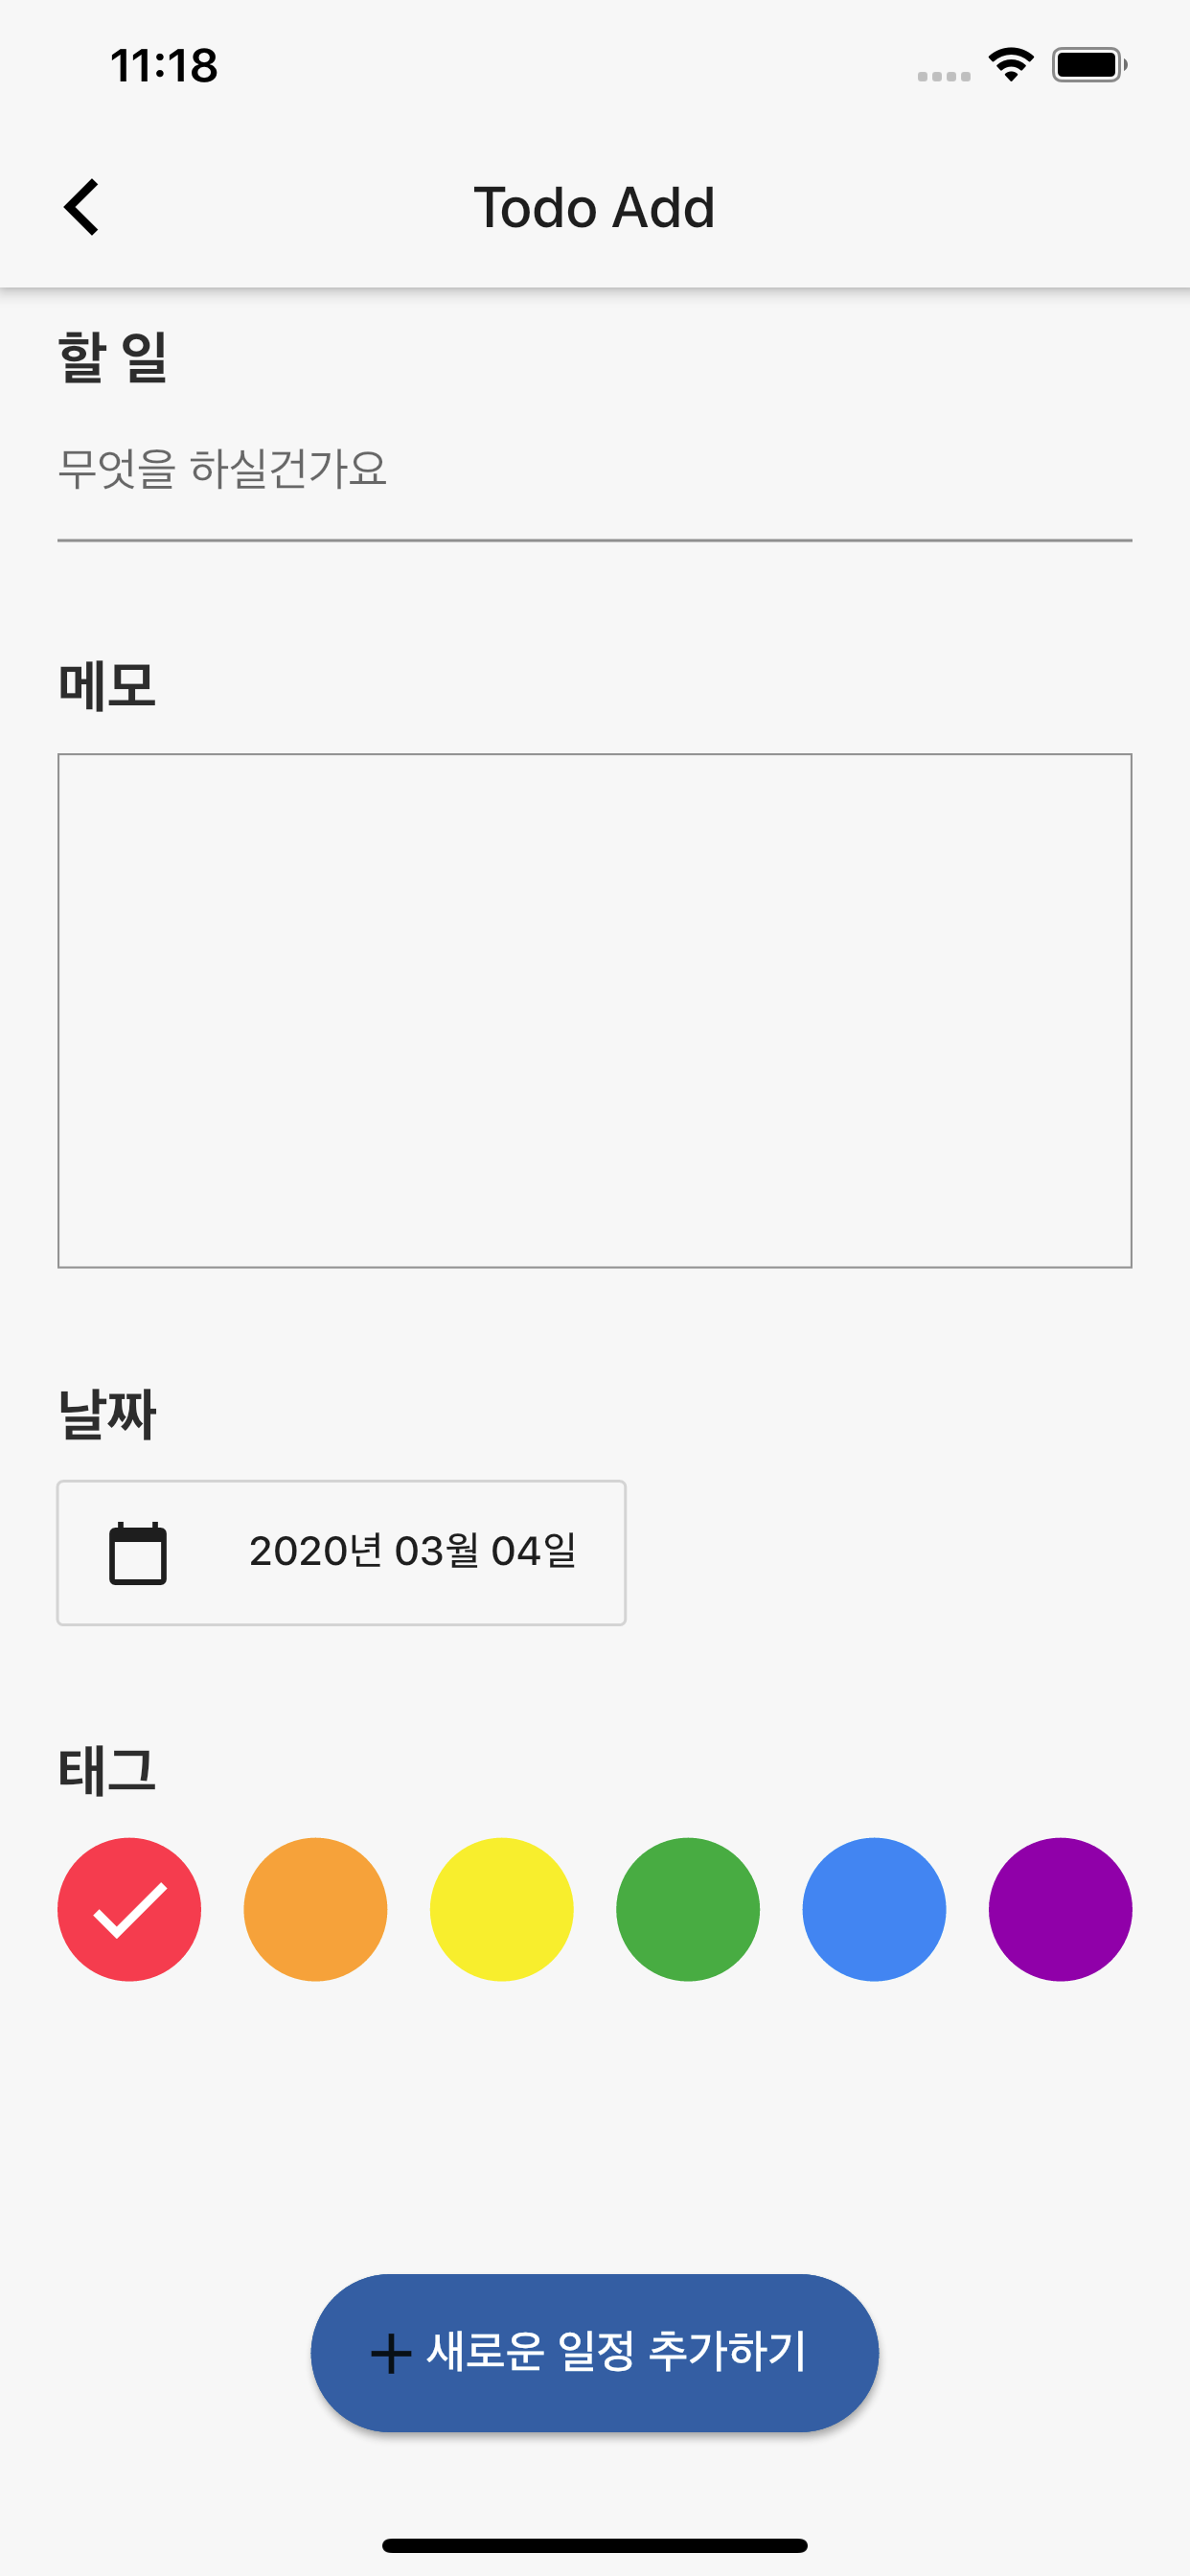
앞에서 만들었던 Todo List를 이어서 만들어 보려고 합니다. 앞에서는 간단히 모델, 데이터를 보여주는 리스트, 체크 박스를 눌렀을때의 반응, listTile을 눌렀을때의 반응에 대한 기본적인 동작에 대해 다루었습니다. 여기서 부터는 실제로 데이터를 추가하는 방법에 대해 포스팅을 할려 합니다. 그러기 위해서는 미리 만들어 두었던 Todo Add page의 layout을 짜야 합니다.
1. todo_add.dart에 레이아웃 짜기
레이아웃의 경우 아래처럼 짤려고 합니다. 그러기 위해서는 2개의 텍스트 컨트롤러, 하나의 Raised Button, 마지막으로 달력을 보이게 할수 있는 것을 만들어야 합니다. 전의 포스팅 처럼 코드를 올리고 각각에 주석을 다는 형식으로 진행을 하겠습니다.
 |
 |
import 'package:flutter/cupertino.dart';
import 'package:flutter/material.dart';
import 'package:flutter/widgets.dart';
import 'package:flutter_bloc/flutter_bloc.dart';
import 'package:intl/intl.dart';

import 'blocs/todoBloc/bloc.dart';

class TodoAdd extends StatefulWidget {
  _TodoAdd createState() => _TodoAdd();
}

class _TodoAdd extends State<TodoAdd> {
  // ignore: close_sinks

  //앞에서 생성된 Todo Bloc을 계속해서 사용을 할것이다.
  TodoBloc _todoBloc;

  //todo의 제목을 위한 컨트롤러, 설명을 위한 컨트롤러 그리고 내가 지정한 날짜를 위한 컨트롤러 이렇게 세가지를 선언한다.
  TextEditingController todo = TextEditingController();
  TextEditingController description = TextEditingController();
  String selectDate;

  //이것은 받아온 DateTime을 특정 형태로 바꾸는 방법이다.
  String formattedDate = DateFormat('yyyy년 MM월 dd일').format(DateTime.now());

  @override
  void initState() {
    // TODO: implement initState
    super.initState();
    //앞에서 생성된 블럭을 받아와 계속 해서 사용하게 된다.
    _todoBloc = BlocProvider.of<TodoBloc>(context);
  }

  @override
  Widget build(BuildContext context) {
    // TODO: implement build
    return BlocListener(
      listener: (BuildContext context, TodoState state) {},
      bloc: _todoBloc,
      //사실 BlcoBuilder의 경우 body 부분만 감싸주어도 충분하다.(appbar 부분에서는 변할것이 없기 때문이다.)
      child: BlocBuilder(
          bloc: _todoBloc,
          builder: (BuildContext context, TodoState state) {
            return Scaffold(
                appBar: AppBar(
                  centerTitle: true,
                  title: Text("Todo Add"),
                ),
                body: Container(
                  padding: EdgeInsets.fromLTRB(20, 10, 20, 0),
                  child: Column(
                    crossAxisAlignment: CrossAxisAlignment.start,
                    children: <Widget>[
                    //여기서 부터 메모까지는 간단하게 Text, TextField를 활용하는 것이다.
                      Container(
                          height: 30,
                          alignment: Alignment.centerLeft,
                          child: Text(
                            '할 일',
                            style: Theme.of(context).textTheme.display1,
                          )),
                      TextField(
                        decoration: InputDecoration(hintText: '무엇을 하실건가요'),
                        controller: todo,
                      ),
                      Padding(
                        padding: const EdgeInsets.only(top: 40, bottom: 10),
                        child: Text(
                          '메모',
                          style: Theme.of(context).textTheme.display1,
                        ),
                      ),
                      /*
                      특이한 점이 있다면 이부분에서는 TextField에 기본적으로 있는 border를 없애고
                      Cotainer로 감싸주어 richTextField 처럼 보이게 만들어 주었다는 것이다.
                      */
                      Container(
                        height: MediaQuery.of(context).size.height * 0.2,
                        padding: EdgeInsets.fromLTRB(10, 5, 10, 5),
                        decoration: BoxDecoration(
                          shape: BoxShape.rectangle,
                          border: Border.all(
                            color: Colors.grey,
                            width: 0.7,
                          ),
                        ),
                        child: TextField(
                          cursorColor: Theme.of(context).primaryColor,
                          textInputAction: TextInputAction.newline,
                          keyboardType: TextInputType.multiline,
                          maxLines: null,
                          controller: description,
                          textAlign: TextAlign.left,
                          decoration: InputDecoration(
                            border: InputBorder.none,
                          ),
                        ),
                      ),
                      SizedBox(
                        height: 40,
                      ),
                      Padding(
                        padding: EdgeInsets.only(bottom: 10),
                        child: Text(
                          '날짜',
                          style: Theme.of(context).textTheme.display1,
                        ),
                      ),
                      /*여기서는 달력을 dialog로 보여주기 위한 작업이 들어가 있다.
                      하지만 너무 어렵게 생각할 필요가 없는 것이 flutter에서 이미 제공해주고 있기 때문이다.
                      그래서 onTab을 했을때 해당 기능을 불러와 사용하기만 하면 된다.
                       더불어 달력에서 날짜를 선택했을때 버튼에 날짜를 어떻게 블록을 이용하여
                       변경해주가에 대해서도 생각 해보야야 한다.*/
                      OutlineButton(
                        child: Container(
                          width: MediaQuery.of(context).size.width / 2.5,
                          height: 50,
                          child: Row(
                            mainAxisAlignment: MainAxisAlignment.spaceBetween,
                            children: <Widget>[
                              Icon(Icons.calendar_today),
                              Text(formattedDate),
                            ],
                          ),
                        ),
                        onPressed: () {
                          _selectDate(context, state);
                        },
                      ),
                      SizedBox(
                        height: 40,
                      ),
                      //버튼을 가장 밑으로 내려 버리기 위한 Expanded
                      //floating button을 사용하여도 상광이 없었을것 같다...
                      Expanded(
                        child: Container(),
                      ),
                      Padding(
                        padding: const EdgeInsets.only(bottom: 50),
                        child: Center(
                          child: RaisedButton(
                          //버튼의 모양을 동글동글하게 바꿔 주기 위한 부분이다.
                            shape: RoundedRectangleBorder(
                              borderRadius: new BorderRadius.circular(30.0),
                              side: BorderSide(color: Color(0xFF266DAC)),
                            ),
                            color: Color(0xFF266DAC),
                            // 이 부분을 통해서 todo에 반드시 데이터가 들어가야 함을 dialog글 통해 보여 줄수 있도록 하고
                            // 만약 todo 부분에 데이터가 있으면 저장하는 과정이 실행이 되도록 해야한다.
                            onPressed: () {
                            //add 이벤트가 실행될때는 각각의 controller의 값들을 불러와 전달하게 해주면 될것이다.
                            //id의 이런 간단한 todo List에서는 사용을 할 필요가 없어 0으로 설절을 해두었다.
                              if (todo.text.isNotEmpty) {
                                _todoBloc.add(TodoAddPressed(
                                    id: 0,
                                    todo: todo.text,
                                    desc: description.text,
                                    date: selectDate));
                                    Navigator.pop(context);
                              } else {
                                showDialog(
                                    context: context,
                                    builder: (BuildContext context) {
                                      return AlertDialog(
                                        title: Text('할일 섹션을 반드시 채워 주세요!'),
                                        content: Text("Select button you want"),
                                        actions: <Widget>[
                                          FlatButton(
                                            child: Text('OK'),
                                            onPressed: () {
                                              Navigator.pop(context, "OK");
                                            },
                                          ),
                                        ],
                                      );
                                    });
                              }
                            },
                            child: Container(
                              width: MediaQuery.of(context).size.width / 2.5,
                              height: 55,
                              child: Row(
                                children: <Widget>[
                                  Icon(Icons.add),
                                  Text(
                                    '새로운 일정 추가하기',
                                    style: TextStyle(
                                        color: Colors.white, fontSize: 16),
                                  ),
                                ],
                              ),
                            ),
                          ),
                        ),
                      ),
                    ],
                  ),
                ));
          }),
    );
  }

  //해당 메서드를 통하여 달력을 호출할수가 있다. 그리고 선택된 값으로 state를 업데이트 해주는 작업이 필요하게 될 것이다.
  Future<void> _selectDate(BuildContext context, TodoState state) async {
    DateTime d = await showDatePicker(
      context: context,
      initialDate: DateTime.now(),
      firstDate: DateTime(2020),
      lastDate: DateTime(2050),
    );

    selectDate = DateFormat('yyyy-MM-dd').format(d);
    _todoBloc.add(AddDateChanged(date: selectDate));
  }
}
2. todo_state에 필요한 state 추가하기. 사실 이부분에서는 달력에서 현재와 다른 날짜를 선택했을때의 상태를 관리하여 주기 위한 date state만 더 추가하여 주면 될 것이다.
import 'package:flutter_app_todo/models/todo_model.dart';
import 'package:intl/intl.dart';
import 'package:meta/meta.dart';

class TodoState {
  final List<Todo> todoList;
  final String date;

  TodoState({
    @required this.todoList,
    @required this.date,
  });

  factory TodoState.empty() {
    return TodoState(
      todoList: [
        Todo(
            id: 0,
            todo: "토익 공부하기",
            date: "2020.02.27",
            checked: false,
            desc: "토익 공부 열심히 해야해..."),
        Todo(
            id: 1,
            todo: "swift인강듣기",
            date: "2020.02.27",
            checked: false,
            desc: "ios 위젯을 만들어야하는데..."),
        Todo(
            id: 2,
            todo: "양파 썰기",
            date: "2020.02.27",
            checked: false,
            desc: "양파야 너무 맵다..."),
        Todo(
            id: 3,
            todo: "가스비 내기!!",
            date: "2020.02.27",
            checked: false,
            desc: "통장에서 자동이체라니...으으으으 마음 아파."),
        Todo(
            id: 4,
            todo: "월세 내기!",
            date: "2020.02.27",
            checked: false,
            desc: "월세는 언제 내야 하더라..."),
        Todo(
            id: 5,
            todo: "영양제 챙겨 먹",
            date: "2020.02.27",
            checked: false,
            desc: "영양제를 꼭꼭 챙겨먹어요...특히 비타민 D가 필요해"),
      ],
      date: DateFormat('yyyy-MM-dd').format(DateTime.now()).toString(),
    );
  }

  TodoState update({
    List<Todo> todoList,
    String date,
  }) {
    return copyWith(
      todoList: todoList,
      date: date,
    );
  }

  TodoState copyWith({
    List<Todo> todoList,
    String date,
  }) {
    return TodoState(
      todoList: todoList ?? this.todoList,
      date: date ?? this.date,
    );
  }
}
3. todo_event.dart 부분에서는 달력이 바뀌었을때의 event, 새로운 일정 추가하기 버튼일 눌렸을때의 event 두가지를 만들어야 한다.
import 'package:equatable/equatable.dart';
import 'package:flutter/material.dart';

@immutable
abstract class TodoListEvent extends Equatable {
  TodoListEvent([List props = const []]) : super(props);
}

class TodoPageLoaded extends TodoListEvent {
  @override
  String toString() {
    // TODO: implement toString
    return "TodoPageLoaded";
  }
}

class TodoListCheck extends TodoListEvent {
  final int index;

  TodoListCheck({@required this.index});

  @override
  String toString() {
    // TODO: implement toString
    return "TodoListCheck";
  }
}

//여기 밑의 두가지가 전의 코드에서 새로이 추가된 두개의 이벤트이다.
// AddDateChagned의 경우 달력에서 날짜를 설정 하게 될 경우 일어나는 상황을 설정한것이다.
class AddDateChanged extends TodoListEvent {
  final String date;

  AddDateChanged({@required this.date});

  @override
  String toString() {
    // TODO: implement toString
    return "AddDateChanged {date : $date}";
  }
}
// TodoAddPressed의 경우 새로운 일정 추가하기 버튼이 눌렸을때 일어날 상황을 설정한 것이다.
// 여기서는 todo 의 id, todo 의 title, todo의 설명, 날짜를 받아 오게 된다.
class TodoAddPressed extends TodoListEvent {
  final int id;
  final String todo;
  final String date;
  final String desc;

  TodoAddPressed({
    @required this.id,
    @required this.todo,
    @required this.date,
    @required this.desc,
  });

  @override
  String toString() {
    // TODO: implement toString
    return "TodoListCheck {id : $id, todo : $todo, datd : $date, desc : $desc}";
  }
}
4. todo_bloc.dart 부분에서는 새로이 만들어진 event에 대해 관리하는 것들을 추가해 주어야 한다. 날짜가 변경되는 경우는 date하나를 받아와 바로 state를 업데이트 해주면 되지만 버튼이 눌러졌을때의 상황은 그리 간단하지 않다. 다시금 모델에 받아온 데이터를 넣어줘야 하고 그것을 이미 존재하는 todoList에 넣어주어야 하기 때문이다. 코드를 보면 좀더 쉽게 이해가 될것이다.
import 'package:bloc/bloc.dart';
import 'package:flutter_app_todo/blocs/todoBloc/bloc.dart';
import 'package:flutter_app_todo/models/todo_model.dart';

class TodoBloc extends Bloc<TodoListEvent, TodoState> {
  @override
  // TODO: implement initialState
  TodoState get initialState => TodoState.empty();

  @override
  Stream<TodoState> mapEventToState(TodoListEvent event) async* {
    // TODO: implement mapEventToState
    if (event is TodoPageLoaded) {
      yield* _mapTodoPageLoadedToState();
    } else if (event is TodoListCheck) {
      yield* _mapTodoListCheckToState(event.index);
    }
    //새로이 추가가 되는 부분입니다.
    else if (event is AddDateChanged) {
      yield* _mapAddDateChangedToState(event.date);
    } else if (event is TodoAddPressed) {
      yield* _mapTodoAddPressedToState(
          event.id, event.todo, event.date, event.desc);
    }
  }

  Stream<TodoState> _mapTodoPageLoadedToState() async* {
    yield state.update(todoList: state.todoList);
  }

  Stream<TodoState> _mapTodoListCheckToState(int index) async* {
    Todo currentTodo = Todo(
        id: state.todoList[index].id,
        todo: state.todoList[index].todo,
        date: state.todoList[index].date,
        checked: state.todoList[index].checked == true ? false : true);

    List<Todo> cTodoList = state.todoList;
    cTodoList[index] = currentTodo;
    yield state.update(todoList: cTodoList);
  }

  //date를 넘겨 받아 바로 state를 업데이트를 해주면 끝이난다.
  Stream<TodoState> _mapAddDateChangedToState(String date) async* {
    yield state.update(date: date);
  }

  //추가 버튼을 눌렀을 때의 경우 Todo model로 새로이 만들어 주어야 하고
  //그것을 원래 존재하는 리스트에 넣어준다.
  //그리고 갱신된 리스트로 state를 업데이트 시켜준다.
  Stream<TodoState> _mapTodoAddPressedToState(
      int id, String todo, String date, String desc) async* {
    Todo newTodo =
        Todo(id: id, todo: todo, date: date, desc: desc, checked: false);

    List<Todo> currentTodo = state.todoList;
    currentTodo.add(newTodo);

    yield state.update(todoList: currentTodo);
  }
}
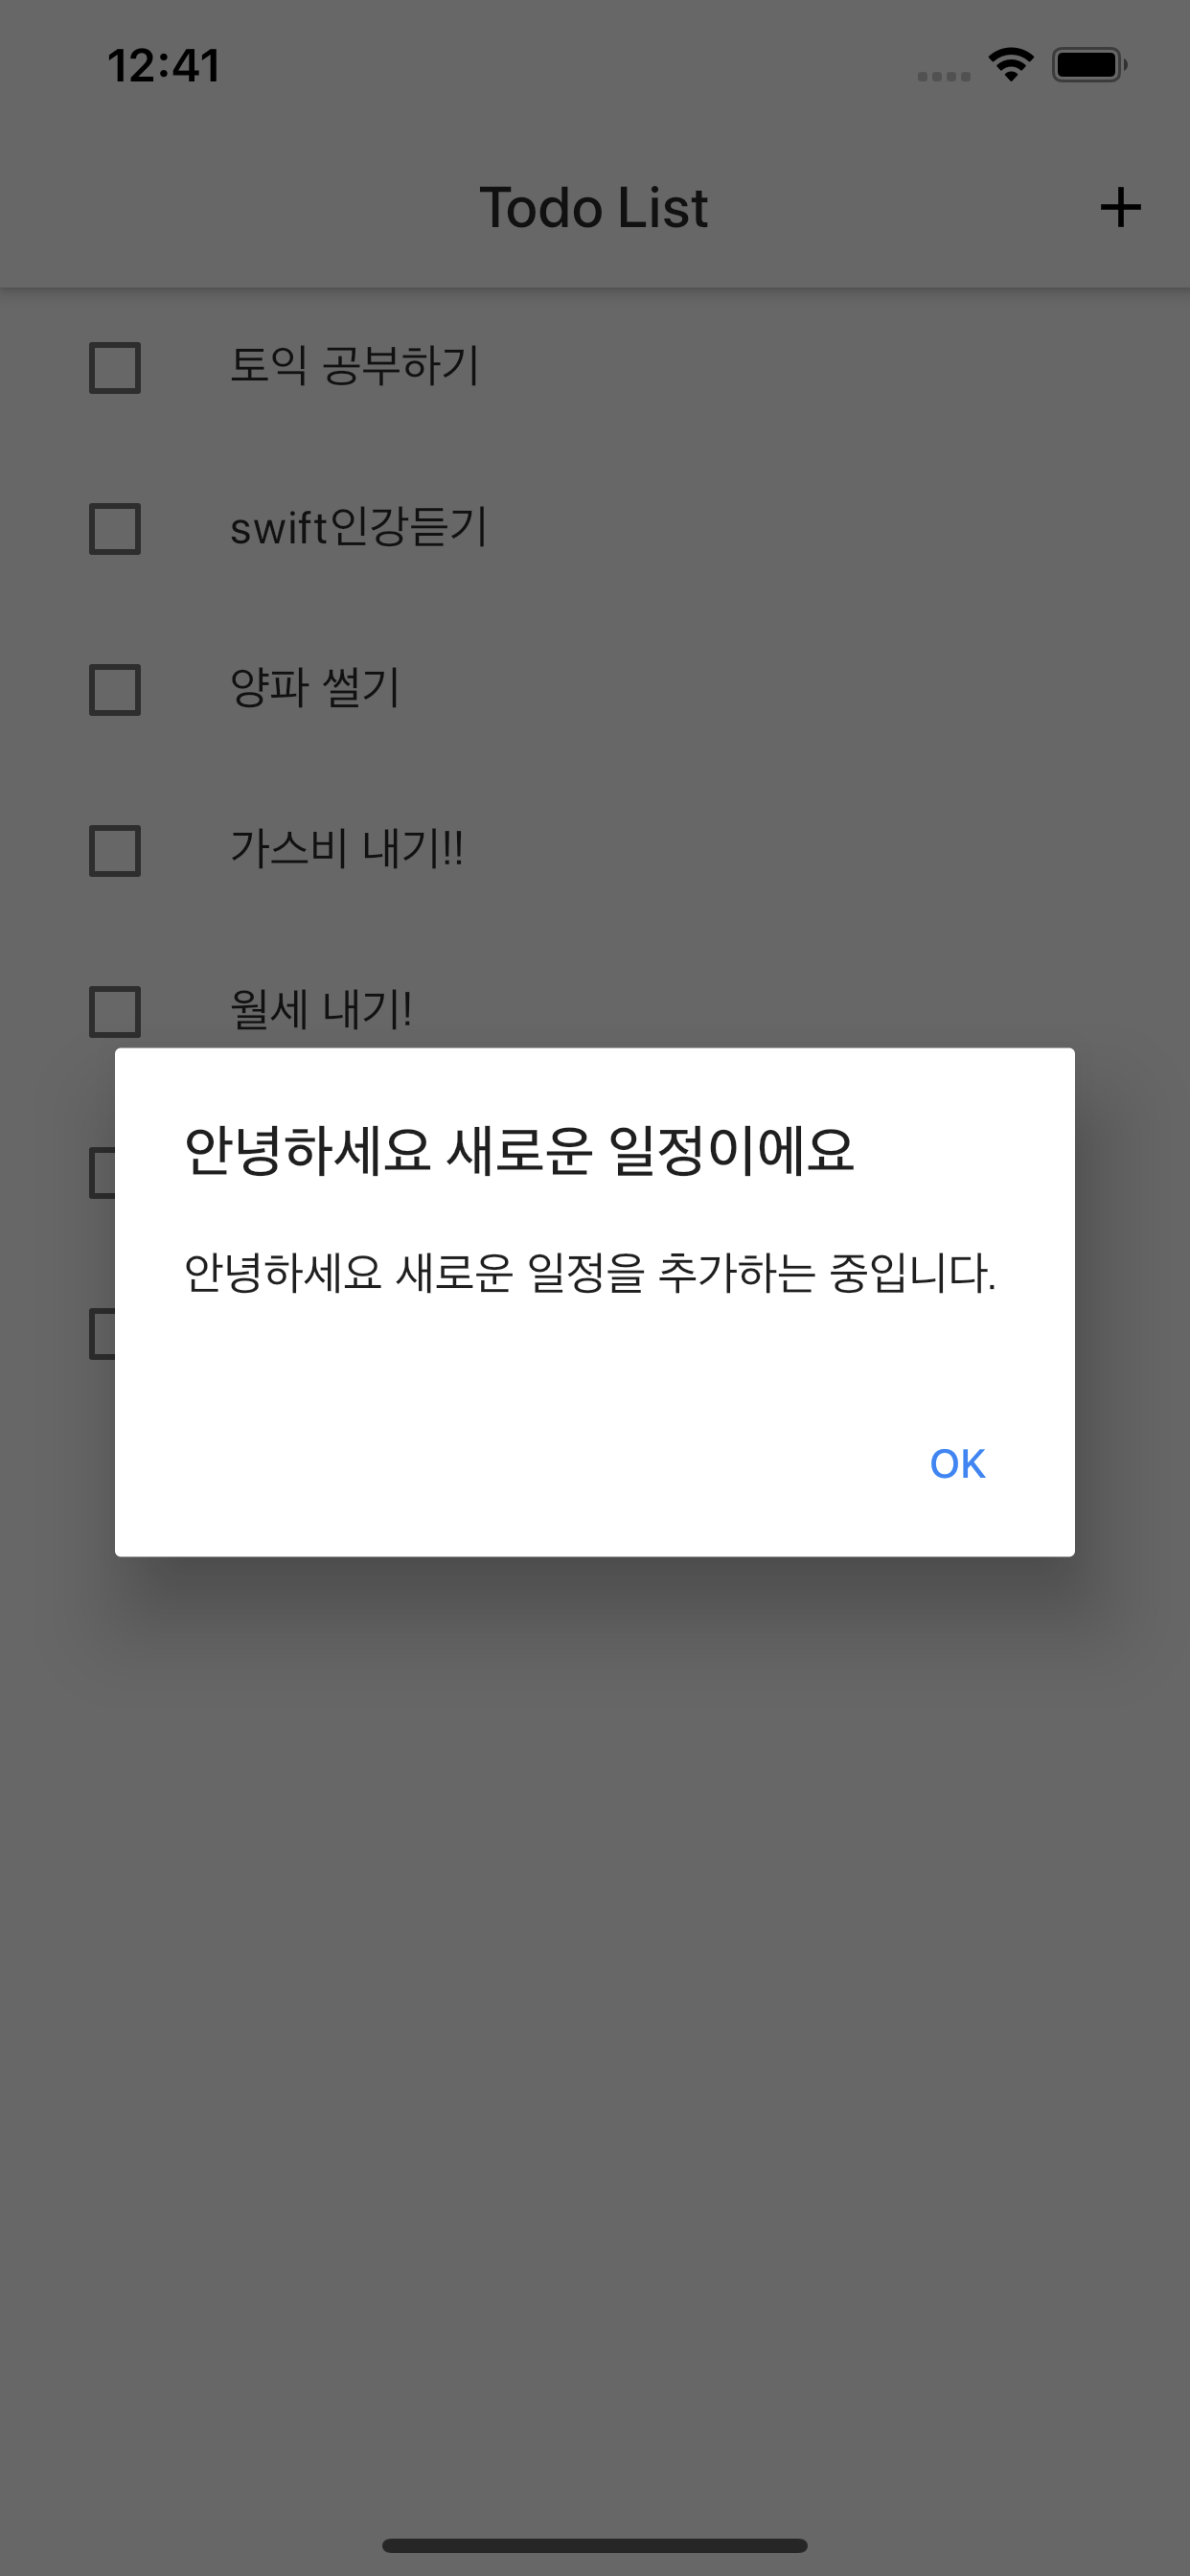
이렇게 todo를 추가하는 List에 추가하는 방식을 알아 보았다. 레이아웃을 그리는 과정이 번거로울뿐 사실상 bloc에서 많은 것이 이루어지진 않는 것 같네요... 그래도 이를 통해서 조금이라도 보는 사람들이 도움을 얻었으면 좋겠습니다... 다음 단계에서는 아마 디바이스에 저장을 하고 해당 데이터를 불러와 보여주는 것을 할까 생각을 하고는 있지만... 나도 해본적이 없는 부분이라 잘 될지는 모르어요... 아 완성을 하게 되면 다음과 같은 모습이 나오게 됩니다.
 |
 |
 |
 |
'flutter > BLoC' 카테고리의 다른 글
| Flutter) Bloc으로 Todo List 만들기 (1) (0) | 2020.02.28 |
|---|---|
| Flutter) Bloc 패턴 적용을 위한 flutter_bloc widget(1) (0) | 2020.02.07 |
| Flutter) BLoC으로 counter 만들기 (0) | 2020.01.18 |
| Flutter) BLoC 이해 (2) | 2020.01.12 |

